앞선 글에서는 Docker 이미지를 만들고, 생성한 이미지를 Container Registry에 푸시하는 것 까지 진행했다.
이번 글에서는 GKE 배포를 위한 설정 파일을 작성해보도록 하자.
GKE 배포를 위해서는 프로젝트 루트 폴더에 설정 파일을 생성해야 하는데, 여기에서는 deployment.yaml 이라는 이름의 파일을 생성해 배포 설정을 진행한다.
배포 객체 설정
먼저 배포 설정을 위한 내용을 작성한다.
1
2
3
4
5
6
7
8
9
10
11
12
13
14
15
16
17
18
19
20
21
22
23
24
25
26
27
28
29
30
31
32
33
34
35
36
37
38
39
40
apiVersion: apps/v1
kind: Deployment
metadata:
  name: test-api-deployment
  namespace: api
spec:
  progressDeadlineSeconds: 600
  replicas: 1
  revisionHistoryLimit: 10
  selector:
    matchLabels:
      app: test-api
  template:
    metadata:
      creationTimestamp: null
      labels:
        app: test-api
    spec:
      containers:
        - image: gcr.io/[PROJECT_ID]/[REGISTRY_NAME]:snapshot  # Docker 이미지 이름
          imagePullPolicy: Always
          name: test-api
          resources:
            limits:
              cpu: 500m
              ephemeral-storage: 1Gi
              memory: 1Gi
          securityContext:
            capabilities:
              drop:
                - NET_RAW
          terminationMessagePath: /dev/termination-log
          terminationMessagePolicy: File
      dnsPolicy: ClusterFirst
      restartPolicy: Always
      schedulerName: default-scheduler
      securityContext:
        seccompProfile:
          type: RuntimeDefault
      terminationGracePeriodSeconds: 3
인그레스 객체 설정
다음은 인그레스 설정이다.
트래픽을 클러스터 내부 서비스로 라우팅하기 위해 인그레스를 사용한다. 여기에서는 외부 HTTP(S) 부하 분산용 인그레스를 설정할 것이다.

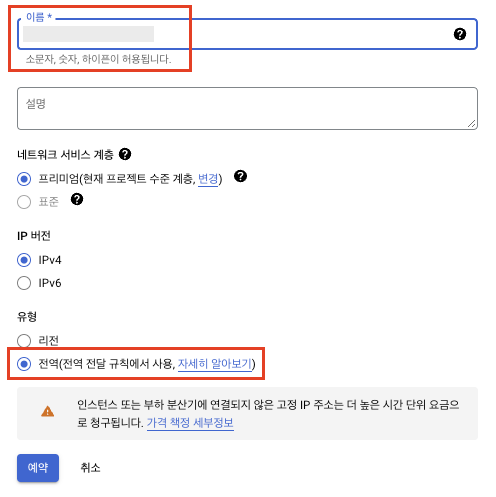
인그레스 설정을 위해서는 고정 IP가 필요하다. 고정 IP 생성을 위해 GCP 콘솔 - VPC 네트워크 - IP 주소 페이지에 접속한 후, 상단의 외부 고정 주소 예약을 클릭한다.

고정 IP 이름을 입력하고, 주소 유형을 전역으로 선택하여 고정 IP를 생성한다. 
전역이 아닌 리전을 선택하여 생성하는 경우, 인그레스 설정 시에 kubernetes.io/ingress.global-static-ip-name 이 아닌 kubernetes.io/ingress.regional-static-ip-name 으로 설정해주어야 한다.
다시 deployment.yaml 파일로 돌아와, 다음과 같이 인그레스 설정 내용을 하단에 추가한다.
1
2
3
4
5
6
7
8
9
10
11
12
13
14
15
apiVersion: networking.k8s.io/v1
kind: Ingress
metadata:
  name: test-api-ingress
  namespace: api
  annotations:
    networking.gke.io/v1beta1.FrontendConfig: test-api-frontendconfig
    kubernetes.io/ingress.global-static-ip-name: test-api-static-ip  # 생성한 고정 ip 이름
    kubernetes.io/ingress.allow-http: "false"
spec:
  defaultBackend:
    service:
      name: test-api-service
      port:
        number: 80
그리고 부하 분산기에 설정할 프론트엔드 및 백엔드 설정은 아래와 같이 구성한다.
(프론트엔드 설정은 인그레스 객체에서, 백엔드 설정은 서비스 객체에서 참조한다.)
프론트엔드 설정에는 SSL 정책을, 백엔드 설정에는 상태 확인(health-check) 설정을 해주었다.
1
2
3
4
5
6
7
8
9
10
11
12
13
14
15
16
17
18
19
20
21
22
23
apiVersion: networking.gke.io/v1beta1
kind: FrontendConfig
metadata:
  name: test-api-frontendconfig
  namespace: api
spec:
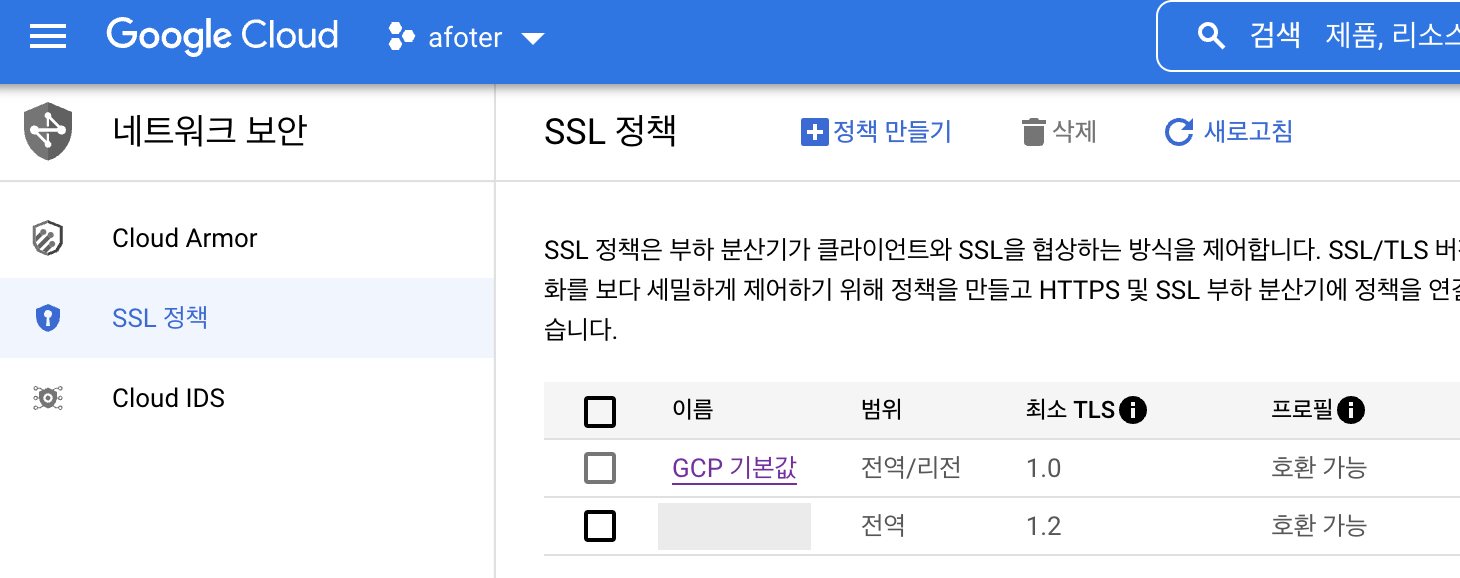
  sslPolicy: ssl-policy-tls12  # GCP의 SSL 정책 이름 (*)
  redirectToHttps:
    enabled: true
---
apiVersion: cloud.google.com/v1
kind: BackendConfig
metadata:
  name: test-api-backendconfig
  namespace: api
spec:
  timeoutSec: 30
  healthCheck:
    type: HTTP
    checkIntervalSec: 5
    timeoutSec: 5
    healthyThreshold: 2
    unhealthyThreshold: 2
- (*) : GCP 콘솔 - 네트워크 보안 - SSL 정책 페이지에서 설정한 ssl 정책 이름
![image]()
인증서 설정
설정한 부하 분산기에 Google SSL 인증서를 설정하는 방법이다.
인그레스와 같은 네임스페이스에 ManagedCertificate 객체를 만들고, 인그레스 설정에 해당 객체를 연결해준다. ManagedCertificate 객체 설정은 아래와 같다.
1
2
3
4
5
6
7
8
apiVersion: networking.gke.io/v1
kind: ManagedCertificate
metadata:
  name: test-api-managed-certificate
  namespace: api
spec:
  domains:
    - api.test.com  # 연결할 도메인 이름
앞서 작성해둔 인그레스 설정에 아래와 같이 ManagedCertificate 객체를 연결한다.
1
2
3
4
5
6
7
8
9
10
11
12
13
14
15
16
apiVersion: networking.k8s.io/v1
kind: Ingress
metadata:
  name: test-api-ingress
  namespace: api
  annotations:
    networking.gke.io/v1beta1.FrontendConfig: test-api-frontendconfig
    networking.gke.io/managed-certificates: test-api-managed-certificate  # (*)
    kubernetes.io/ingress.global-static-ip-name: test-api-static-ip
    kubernetes.io/ingress.allow-http: "false"
spec:
  defaultBackend:
    service:
      name: test-api-service
      port:
        number: 80
서비스 객체 설정
다음은 서비스 객체 설정이다. 앞서 생성한 백엔드 설정을 서비스 객체와 연결해주어야 한다.
1
2
3
4
5
6
7
8
9
10
11
12
13
14
15
16
17
18
19
apiVersion: v1
kind: Service
metadata:
  namespace: api
  name: test-api-service
  annotations:
    cloud.google.com/backend-config: '{"default": "test-api-backendconfig"}'
spec:
  ports:
    - name: proxy
      port: 80
      protocol: TCP
      targetPort: 80
    - name: ssl
      port: 443
      protocol: TCP
      targetPort: 8443
  selector:
    app: test-api
이 때, spec.selector에는 이 서비스가 적용될 파드 정보를 지정해준다. 앞서 배포 객체 설정에 작성해주었던 template 이름을 이 부분에 넣어주자!
(이 부분을 설정해주지 않아 쿠버네티스 파드와 서비스가 연결되지 않는 문제가 있었다🥲)
(선택사항) 영구 볼륨 설정
GKE 배포 시에 GCP Filestore를 영구 볼륨으로 마운트하는 방법을 정리해보았다. 필수 설정은 아니고, 필요한 경우 설정해주면 된다.
참고로, Filestore 인스턴스는 배포할 클러스터와 동일한 VPC 네트워크에 있어야 한다.
먼저, Filestore 인스턴스에 액세스할 수 있도록 영구 볼륨 객체를 아래와 같이 설정한다.
(Filestore 인스턴스는 이미 생성해 둔 것으로 가정한다!)
1
2
3
4
5
6
7
8
9
10
11
12
13
apiVersion: v1
kind: PersistentVolume
metadata:
  name: test-api-pv
  namespace: api
spec:
  capacity:
    storage: 50Gi   # Filestore 인스턴스의 파일 공유 크기
  accessModes:
    - ReadWriteMany
  nfs:
    path: /test_file   # Filestore 인스턴스 파일 공유 이름
    server: [FILESTORE_INSTANCE_IP]   # Filestore 인스턴스 파일 공유 IP 주소
그 다음으로 영구 볼륨 클레임 설정 구성을 작성한다.
1
2
3
4
5
6
7
8
9
10
11
12
13
apiVersion: v1
kind: PersistentVolumeClaim
metadata:
  name: test-api-pv-claim
  namespace: api
spec:
  storageClassName: ""
  volumeName: test-api-pv  # 영구 볼륨 객체 이름
  accessModes:
    - ReadWriteMany
  resources:
    requests:
      storage: 50Gi   # Kubernetes 객체에서 사용 가능하도록 할 영구 볼륨 클레임 크기
앞서 작성한 배포 설정(Deployment)의 파드 사양 부분과 영구 볼륨 클레임을 연결한다.
1
2
3
4
5
6
7
8
9
10
11
12
13
14
15
16
17
18
19
20
21
22
23
24
25
26
27
28
29
30
31
(생략)
...
    spec:
      containers:
        - image: gcr.io/[PROJECT_ID]/[REGISTRY_NAME]:snapshot  # Docker 이미지 이름
          imagePullPolicy: Always
          name: test-api
          resources:
            limits:
              cpu: 500m
              ephemeral-storage: 1Gi
              memory: 1Gi
          securityContext:
            capabilities:
              drop:
                - NET_RAW
          terminationMessagePath: /dev/termination-log
          terminationMessagePolicy: File
          volumeMounts:
            - name: test-file
              mountPath: [MOUNT_PATH]  # 영구 볼륨을 마운트할 디렉토리 경로
      volumes:
        - name: test-file
          persistentVolumeClaim:
            claimName: test-api-pv-claim
            readOnly: false
      dnsPolicy: ClusterFirst
      restartPolicy: Always
      schedulerName: default-scheduler
...
(생략)
참고사이트
- https://cloud.google.com/kubernetes-engine/docs/concepts/ingress
- https://seongjin.me/kubernetes-service-types/
- https://cloud.google.com/filestore/docs/accessing-fileshares
- https://cloud.google.com/build/docs/deploying-builds/deploy-gke?hl=ko

